Getting Started - Zoom Collaboration Guide:
1. What is a Zoom Collaboration in ampEducator?
2. Requirements for Zoom Collaboration to work
3. How do I set up Zoom with ampEducator?
4. Configure Admin User Permissions in your Zoom Account
5. Create a Zoom App in Zoom Marketplace
6. Schedule an ampEducator Course LMS Zoom Collaboration (Meeting).
7. Start an ampEducator Course LMS Zoom Collaboration (Meeting).
1. What is a Zoom Collaboration in ampEducator?
A Collaboration is an Online Meeting for a Course using a Online Meeting Software Provider. ampEducator allows you to connect your Zoom Pro / Licensed User Account so that your staff (instructors) can schedule, start and record Zoom Meetings from within Courses without having to login to your Zoom directly. The main benefit of this feature is that your staff do not need to add the Students in the Course as participants to the Zoom Meeting as ampEducator handles this task for you.
Note: Recordings will be stored in your Zoom account, not ampEducator but you can retrieve and share the links to stored recordings with students via the Student Portal or by email. Additional fees may apply with your Zoom account. Contact Zoom support for more information on storage fees/plans for recorded meetings.
Once setup the Zoom Collaboration will allow your instructor to schedule and start any meeting in any ampEducator Course that they are assigned (with Collaboration access enabled for their user) and either email all students enrolled in the Course in ampEducator a unique Zoom meeting link OR students can login to the Student Portal to click on a link found in the Course if you prefer not to email the meeting link.
2. Requirements for Zoom Collaboration to work with ampEducator:
A Zoom Pro / Licensed User Account is required
Admin User Role is required in ampEducator
Understand security settings for Zoom https://support.zoom.us/hc/en-us/articles/360041848151
3. How do I set up Zoom with ampEducator?
To setup Zoom with ampEducator you must configure Admin User Permissions in your Zoom Account and then Create a Zoom App in the Zoom Marketplace to authenticate ampEducator.
4. Configure Admin User Permissions in your Zoom Account.
a. Select or create an Admin User that will be used by ampEducator to access your Zoom Account.
b. Under Admin / User and Permission Management set Scope to Entire Account.
c. Under Server-to-Server OAuth App make sure both View and Edit are checked.
5. Create a Zoom App in Zoom Marketplace:
a. Go to https://marketplace.zoom.us/develop/create
b. Click on Create under Server-to-Server OAuth and give the application a name such as "ampEducator OAuth"

c. Under Information Fill out your Details. Company Name, Developer Name (You), Developer Email (Your Email).
d. Under Scopes add the following scopes by clicking Add Scopes

i. Account = Add all 39 from each section:

ii. User = All 62 Scopes

iii. Meeting = All 88 Meeting Scopes:

iv. Recording = 11 Scopes under View and manage all user recordings:

e. Under Activation click "Activate your App"

f. Copy the information under App Credentials to ampEducator under Institution Config / General / Collaboration / Zoom

e. Agree to Zoom's API License and Terms of Use.
f. User Selection: Select the method to manage licenses on your Zoom Account. This tells ampEducator and Zoom how to manage Licenses in your Zoom Account. Note: Zoom and ampEducator use email to match up users or select them. The option you select depends on how many concurrent meetings you may have at any given time and or how many licenses you have purchased with Zoom:
- Individual. Each user has their own Zoom account which is used when they add a collaboration. Admin users can select which user to assign a collaboration to. ampEducator will match the User Email login to Zoom and automatically set up the meeting with this license. If you assign Instructors with access to Collaboration in the Course then it will use their Zoom account automatically.
- Manually Select. The Zoom account to be used is selected whenever a collaboration is added. Users will select which Account to use. Note: if the Zoom accounts are generic, there is a chance that the User in Zoom will be occupied at the same date and time.
- Auto Select. The software will automatically schedule the collaboration with the first available user (license) in Zoom.
We recommend that each user have their own Zoom account as some options require this, otherwise Auto Select is the best practice if you do not want to select a user each time you set up a Collaboration (meeting).
6. Schedule an ampEducator Course LMS Zoom Collaboration (Meeting).
a. Open any Course you wish to setup with a Zoom Collaboration Meeting
b. Under LMS > Scroll to Collaboration > Click New Collaboration

c. A modal window will open with options to set your Collaboration (Meeting) Details for the Course with Zoom.

d. Select Type: Meeting (A future release will be supporting Webinar options).
e. Title: Enter a Title for the Meeting ie. Course 101 - Lecture on Intro to Zoom.
f. Add Multiple: If "Yes" is selected you can schedule recurring dates for the Meeting(s):

g. Enter Start, End Date and Duration (in Minutes) for the Meeting.
h. Provide a Description for the Meeting (optional).
i. Set a Password for the Meeting. This is required for security reasons otherwise your meeting may be accessible by unauthorized users.
j. Contact Name and Contact Email. Required Contact for the Meeting.
k. Record. If you wish to record the meeting to your Zoom Storage you can select this option. You can view the Recordings of the Meeting once completed, you may need to retrieve them before you can share them with Students using the record icon to the right of the Meeting name once you have created it - see below.
l. With Attendance. An attendance record will be created for each student. The attendance will automatically be updated once the collaboration has ended. If enabled, Threshold will mark the Student as fully attended once they attend for longer than the number of threshold minutes. ie. if the Student attends 45 minutes of a 60 minute session then they will be Present even if they leave early during Q&A at the end of the meeting.
m. Email Users. If selected, students in this Course will receive a link through an email notification when you click Add to create the Meeting. The email to the students will contain a JOIN URL link specific to the Student they can click to Join on the appropriate date and time.
-OR-
f. Use Course Announcements and instruct students to login to ampEducator and click the Meeting URL under the Course. All Enrolled students will be able to access the collaboration link through the student portal whether you email them the link or not. Using the Student Portal to access the Meeting link is recommended if you wish to keep the Meeting link more private.
g. Once you click Add you can see the Scheduled Meeting under Collaboration. Expanding the + icon to the left of the Meeting Name will show the specific Join URL for the instructor and students. These URL are unique to each user and will identify them when in use automatically:
h. You will notice 5 icons to the right of the Meeting Name:

i. Edit Collaboration. Use this to change the Meeting Details.
ii. View Collaboration. Use this to View the Details and/or Start the Meeting. If the meeting is in progress the Start button will be replaced by Join. Clicking on "Advanced" will reveal URL links to Start the meeting or Join as well if you need to copy these to share with users outside of ampEducator that are not Instructors or Students in the Course.

iii. Update Attendance. Clicking this will run a Job to update any Attendance if this option was enabled for the Meeting. Attendance that was taken for Students during a meeting can be viewed, edited or updated by expanding the Collaboration using the [+] sign to the left of the Collaboration Name:

and then using the Edit (Pencil) Icon to the right of the Student:

There is also Collaboration Attendance in the Student Course Attendance Details. This can be viewed by clicking the magnifying glass icon to the right of the Student Name under the Attendance Tab:

Scroll down to view Collaboration Attendance:

iv. View Recordings. Once you have Started and Completed the Meeting if the meeting was recorded you can View Recordings retrieve and share them with Students. Students will be able to access the recording through the Student Portal.
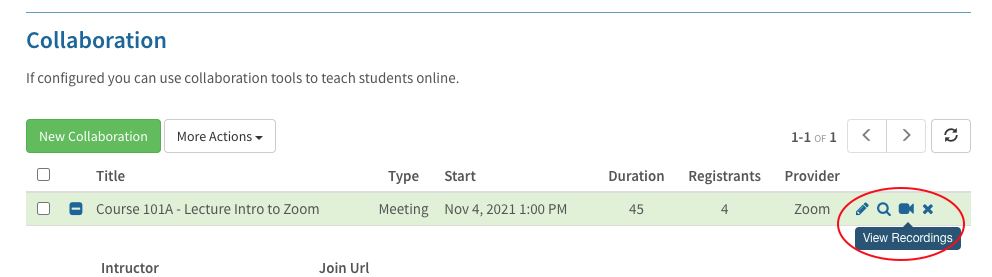

iv. Delete Meeting. If you wish to delete the meeting you can use this function. Note: This cannot be restored once deleted.
7. Start an ampEducator Course LMS Zoom Collaboration (Meeting).
When you are ready, you can login to your Zoom Account and start the Course Meeting or you can Start the meeting using the actions described above either with the Start URL or Start Button.
End of Guide Document | ampEducator Inc. 2021.
Was this article helpful?
That’s Great!
Thank you for your feedback
Sorry! We couldn't be helpful
Thank you for your feedback
Feedback sent
We appreciate your effort and will try to fix the article